


Getting Started With Meal Planning
Become a meal planning pro with these six easy steps!
Meal planning has been integral to my life for many years — even before having kids!
I like to be efficient in grocery shopping and try to run by the store only once weekly, so knowing everything I’ll need beforehand is super helpful to avoid those last-minute grocery runs.
Whether you like to be all planned out or have a lot of flexibility, meal planning can be a great way to clear up some mental space in your week. Sitting down one time to decide your meals for the week will ultimately save you time each day from having to shop and decide on what you want to eat. Less time thinking about and shopping for meals equals more time spent on what matters most to you!

Tips for getting started with meal planning
Set aside a time during the week to plan out your meals. This can be the same time every week (I usually plan meals on Saturday evening or Sunday afternoon), or it can be flexible if your schedule looks different every week.
Look at your calendar. Plan easy meals on days you have events and more time-consuming dinners on open evenings (if that’s your thing!). Sometimes specific meals should be planned on particular days, and other times, meals can be eaten any day of the week. I usually schedule specific meals for specific days, but sometimes it’s fun to move them around based on my mood or on what sounds the most delicious at the moment!
Start with what you have. Look through any produce you may not have used up the previous week. Browse cupboards to see what pantry staples are lying around and plan meals around what’s already in your home. This also helps cut down on food waste and saves money. Win-win!
Eat seasonally where possible. Check out this site to see what foods are in season in your area! This helps you save money as these foods are often cheaper in season, helps reduce emissions since the food is often local and doesn’t have to travel as far, and helps us live more in step with our world and its ever-changing seasons.
Find recipes. Grab meals from your favorites list, pull out cookbooks, or search the web. I’ve loved Pinch of Yum recently, and Rachael’s Good Eats new cookbook. We also have a highlight on our Instagram with lots of meal plans saved for recipe inspiration!
Make a list and shop! Once you’ve compiled your recipes for the week, make a grocery list of every food item you’ll need. Head to your favorite store, and don’t forget to bring your reusable shopping bags!
Make a calendar appointment or set a reminder to do this each week. The more you practice, the easier the habit becomes. Soon enough, you’ll be meal planning like a pro!
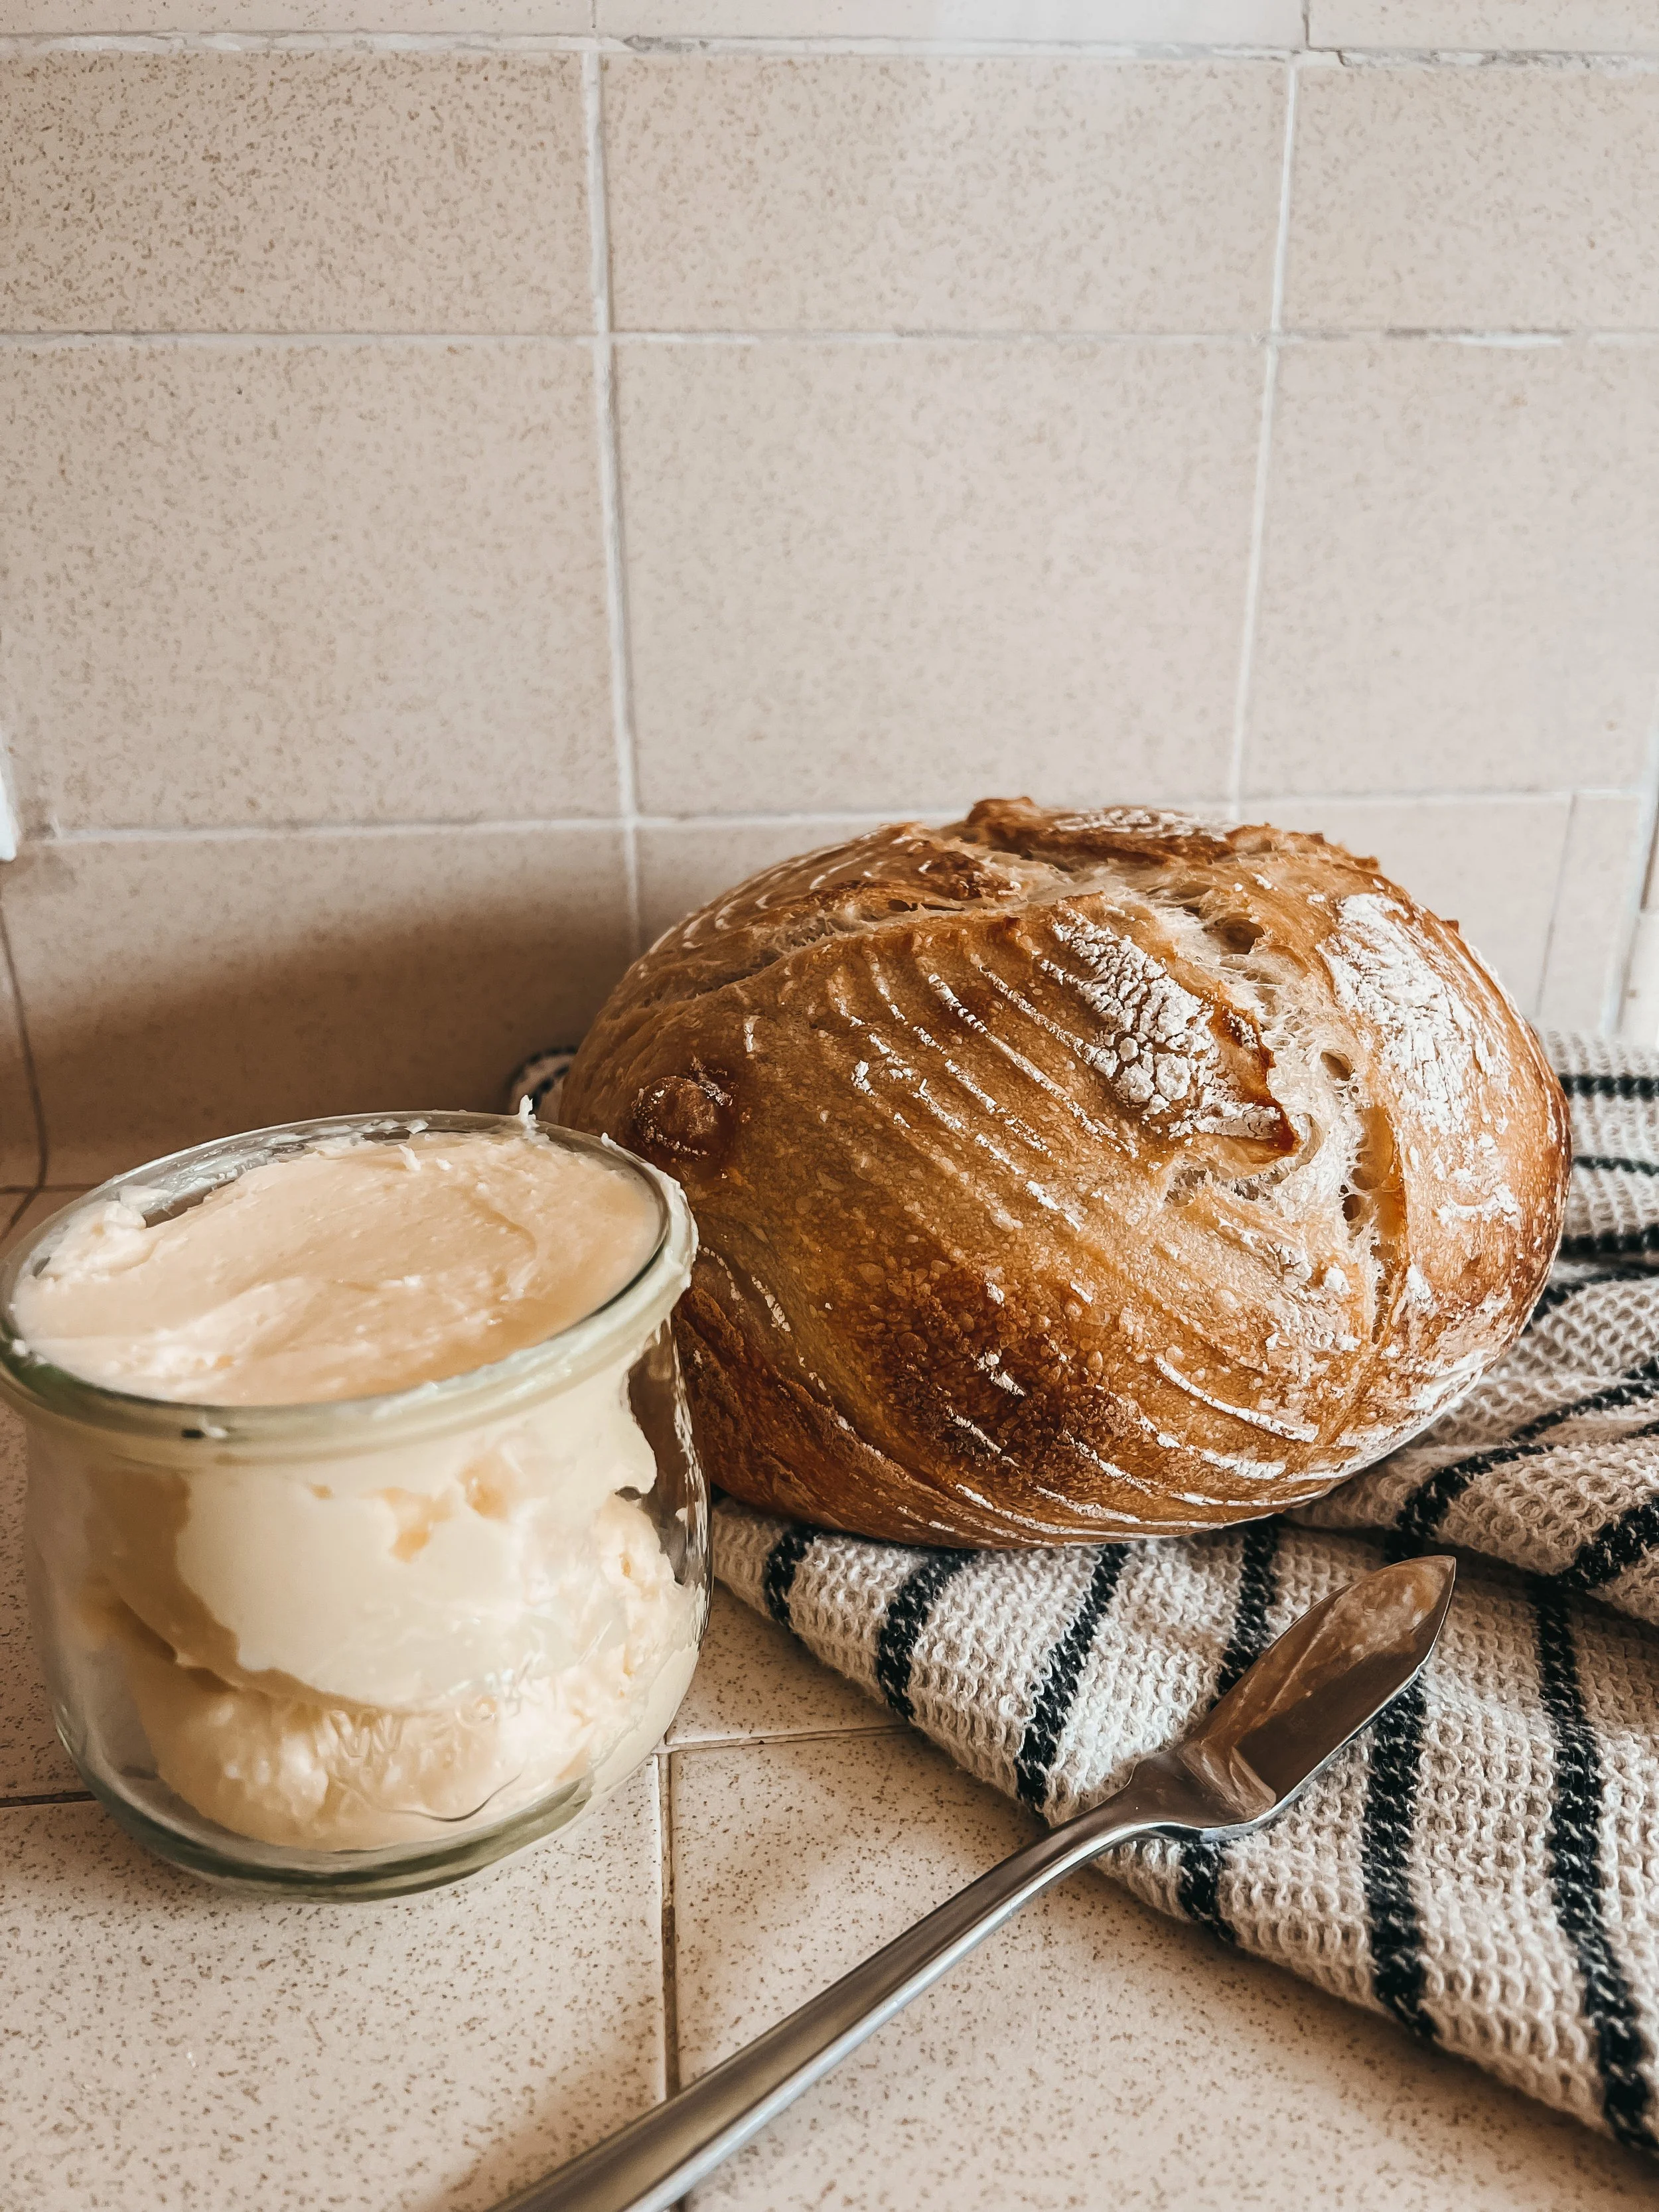
My Sourdough Recipe (step by step method with timing included!)
After years of tinkering and testing, I’m ready to share my sourdough bread recipe with you! This post is packed with info like exact timings for a bake day, all of the tools and ingredients you need, as well as ideas for using us your discard and more!
I’m a late trend-adopter. I watch other people test out something new and then once I’ve seen whether it works or not, I decide to hop in on it or abandon it.
Enter the sourdough craze during lockdown 2020.
I was firmly in the “I will never do this” camp and thought “why would I want to spend so much time on this?!” Sure we had all of the time in the world to do nothing during lockdown, but I had a toddler to run after, random coffee-date-work-zooms, and grocery staples to order for delivery three weeks before they’d actually arrive due to global shortages and shipping delays.
So mid 2021, I finally tried sourdough. After nearly everyone got into it and promptly abandoned it a few months later. I picked up starter from a neighbor in a Buy Nothing group and have been thoroughly enjoying the processes of making sourdough ever since.
I did a good amount of research, nearly chickened out, panic texted friends about how in the world to do it, and then finally tried a recipe that I didn’t love. So I tried again and liked it a little better, and tried another recipe and liked it a little better. Almost two years later I’ve finally found a recipe that I loved and tweaked it to make it my own.
This is what I present to you today.
Before we dive in, let me just say — sourdough sounds intimidating at first, but really it’s pretty simple once you get used to it.

Tools You Need to Bake Sourdough
Kitchen scale: I steal my coffee scale and it works well (and looks beautiful), but you can grab a more basic one like this. We will be making this recipe by weight in grams so this tool is essential.
Jars for starter & discard: use any wide mouth jar you have, but I highly recommend these from Weck. I’ll probably be ordering more soon.
Rubber spatula: this may be non essential, but I still find these to be the easiest tool to mix up my starter with.
Glass bowls: this recipe can be doubled, so find a medium and large size like these if needed!
Dough scraper: not entirely necessary, but definitely helps when shaping the dough. I prefer a plastic one (like these) for a little more flexibility, and a sharp edge for use in cutting if needed.
Bread proofing basket (banneton): the dough will rest in these in the fridge overnight to help maintain its shape. I bought this set of two for when I make a double batch.
Scoring tool (lame): not necessary, but if you’d like to make pretty designs on your loaf, these are fun to have on hand. The bread will naturally split when baking, or by using a lame, you can guide where the bread steams — resulting in a beautiful crust.
Dutch Oven: I like to use this ceramic pot from Caraway — it’s the perfect size for the loaf I bake, but they also carry a larger dutch oven. Any cast iron dutch oven should do the trick though!
Bread knife: this knife cuts fresh bread like no other. It’s not a strictly necessary tool but, boy, is it satisfying to cut your sourdough like butter.
Sourdough Ingredients
Making sourdough only takes a few key ingredients! Here’s what I use in mine:
Sourdough starter: if you don’t already have one, the best way to find some is from a friend! I picked mine up from a Buy Nothing group. If you’d like to make your own, give this recipe a try. Just keep in mind it takes a few days to fully ferment and be ready to use.
Water: I use filtered water for my recipe, but tap water works as well. Just know it might add a slight taste to the bread depending on how clean your tap water is.
Bread flour: The majority of flour used in this recipe is bread flour. Bread flour has a slightly higher protein content than all purpose flour, which makes for a stronger & stretchier dough. The final loaf will have good height & a tall, airy structure to it. I love using King Arthur flour products, so I usually try to buy this brand. If it is unavailable where I’m shopping, I try to grab another organic brand.
All-purpose flour: I add in a little bit of all-purpose flour to give a little bit of density to the loaf. The combo of both all purpose and bread flour makes for a strong but airy loaf that I am obsessed with. King Arthur flour is my go to again! Or whenever I do a Costco run, I buy their two pack of organic all purpose flour. We use a lot of flour around here!
White whole wheat flour: I only use a little bit of whole wheat flour in my recipe — this small amount adds a little bit of depth to the bread without making it overly wheat-y. I also tend to have a bag from King Arthur lying around or I pick up a smaller pouch from Thrive Market since I don’t run through a bag as quickly.
Salt: I only ever use Redmond Real Salt — it’s the best in my opinion!
Polenta/corn grits: grits are sprinkled at the bottom of the pot to help prevent sticking — Bob’s Red Mill is my favorite!

Alisa’s Sourdough Bread Method (with timing!)
I’m going to list out what to do with time stamps for an ideal sourdough bake day. Though admittedly, I’ve started sourdough way later than these timelines and gotten a decent loaf. So you do you. Or do this method. You choose.
8-9am: pull your starter out of the fridge and feed it. I weigh out 100g of starter in a new jar and add 100g filtered water and 100g all purpose flour. Mix it thoroughly — it will not rise if the flour is not fully incorporated. Cover with plastic wrap and place a rubber band around your jar, marking where the starter sits in the jar. Allow to rise in a warm spot in your house or your unheated oven with only the light turned on for 3-4 hours. This step should take you about 5-10 minutes of active work.
12pm: once your starter has doubled (per your rubber band measurement), it is time to mix your dough. Add 100g of starter to a large glass bowl (you will have some starter leftover which you can feed and use for another bake). Add your flour(s) and 75% of your filtered water for the recipe (about 250g). I usually add 300g bread flour, 150g all purpose flour, and 50g white whole wheat flour. You can play around with different amounts of each, but you should end up with 500g of flour in the bowl. Working with your hands, squeeze all of the ingredients together until a shaggy dough is formed. Add 50g more of water and squeeze to mix again. Allow dough to autolyse (rest) for 30 minutes. This step should take you about 10-15 minutes of active work.
12:45pm: after initial mixing and resting, add 10g of salt to your dough and remaining filtered water, about 50g. Mix the dough, using your hands to squeeze the mixture together until dough is smooth and free of clumps. Cover with a damp kitchen towel or plastic wrap and rest for 30 minutes. This step should take 5-10 minutes of active work.
1:25pm: begin stretching and folding the dough. Take about 1/4 of the dough and pull it up as high as it can go without breaking (usually 6ish inches out of the bowl), fold this portion into the center of the dough ball. Rotate the bowl 90 degrees and repeat with another 1/4 of dough. Do this a total of four times until each section of dough has been stretched and folded in on itself. Cover and allow to rest for 30 minutes. This step should only take 1 minute of active work.
1:55pm: complete a second round of stretch and folds. Cover and allow to rest for 30 minutes.
2:25pm: complete a third and final round of stretch and folds. Cover and allow to rise for 4 hours in a clean, well oiled glass bowl.
6:30pm: remove dough from the glass bowl onto a smooth (un-floured) surface. The dough should be slightly sticky, but should not need flour to help you in shaping it. Use a dough scraper if needed. Flatten dough to a rectangle about 12 by 18 inches. Fold the long sides of the rectangle to meet in the middle. Roll the short end of the rectangle in on itself. Keeping the dough on the flat surface, rotate the dough between your hands to create a round, tucking it underneath itself to smooth. Place in floured proofing basket, cover with plastic wrap, and let rest on the counter for 30 minutes. This step should take 5-10 minutes of active work.
7:10pm: place proofing basket in the fridge overnight for a 15 hour proof.
NOTE: At some point in between mixing the flour and putting the bread in the fridge, remember to feed your starter again and let it rise before you throw it back in the fridge. I use the same 100g water—100g starter—100g AP flour as stated above.
9:30am: place your dutch oven into the oven while preheating to 475 degrees F
10am: remove dutch oven from preheated oven and sprinkle about 1 teaspoon of grits/polenta on the bottom. Remove dough from fridge & proofing basket & place into preheated dutch oven. Use a lame to cut a large slit into the bread and make designs if desired (you can also skip this step — the bread will naturally split in the oven as steam is released). Place the lid onto the dutch oven and place in the oven. Bake for 25 minutes
10:30am: when your timer goes off, remove bread from the dutch oven and place directly onto oven rack. Place a wooden spoon in the door of the oven to allow some heat to escape (forgetting this step with burn the crust of the bread!). Continue cooking for 25 minutes.
11am: remove sourdough from the oven and allow to rest on cooling rack. Dive in as soon as possible! Sourdough is super delicious hot out of then oven.

My Favorite Ways to Enjoy Sourdough
Eat right out of the oven with butter and flakey salt.
Make avocado toasts for breakfast/lunch. I like to top mine with pepitas, everything but the bagel seasoning, feta, and tomatoes.
Make a sandwich. I like spreading hummus and stacking with cucumber, roasted peppers, red onion, tomato, and avocado slices.
Make a grilled cheese. Enough said, right? Best with tomato soup IMO.
Toast into croutons. If your bread is starting to stale a bit, chop or tear into small pieces and cook on the stovetop with butter/olive oil and your favorite herb seasonings.
How to Store Sourdough
If you’re not eating it right away, store in a bread bag or box, away from direct sunlight. We usually wrap in plastic wrap to keep the bread from going stale quickly.
Slice and freeze in a bag in between pieces of parchment paper if you won’t be using all of the bread within 5 days.
My Favorite Ways to Use Up Discard
Sourdough baking naturally leaves a good amount of starter leftover (called discard). I like to collect this in a jar to use in recipes right away or throughout the week. These recipes don’t require the starter to be hydrated (risen), so they’ll usually include another leavening agent. But adding the sourdough to everyday recipes gives them that sour tang and added probiotic benefits of sourdough.
Here are some of my favorite discard recipes from around the web:
I’m always looking for more ways to use up discard! I’m currently tweaking my own cracker recipe and I have a pizza dough recipe and sourdough chocolate chip cookie recipe on my list to try next.
Thank you so much for taking the time to read through all of my sourdough tips! I hope your bread comes out beautifully! If not, try, and try again. It takes some time but sourdough baking is worth the effort in my opinion.

Homemade Sourdough Loaf
Ingredients
- 100 grams sourdough starter
- 340 grams filtered water
- 300 grams bread flour
- 150 grams all purpose flour
- 50 grams white whole wheat flour
- 10 grams salt
- Polenta (corn grits) for sprinkling
Instructions
- Feed your sourdough starter and allow to rise for 3-4 hours.
- When your starter has doubled in size, mix together 100 grams of starter with 290 grams of filtered water in a glass mixing bowl. Mix by hand until starter is dissolved in water.
- Add bread flour, all purpose flour, and white whole wheat flour to your bowl. Use your hand to squeeze together the ingredients for 3-5 minutes until a shaggy dough is formed. Cover the dough with a damp kitchen towel or plastic wrap for 30 minutes.
- After 30 minutes, add salt and remaining 50 grams of water. Use your hand to squeeze together the ingredients for 3-5 minutes until a smooth dough forms. Cover for 30 minutes.
- After 30 minutes, stretch and fold the dough. Start by pulling 1/4 of the dough up and out of the bowl as high as it will stretch. Fold into the middle of itself. Repeat 3 more times until all sides of the dough have been stretched and folded. Cover for 30 minutes.
- Repeat step 5 two more times for a total of three rounds of stretch and folds.
- After completing all stretch and folds, set the dough on the counter to rise for 4 hours.
- After four hours, turn the dough out onto a clean surface and shape your loaf. Stretch out the dough to a 12 by 18 inch rectangle, then fold the long sides in to meet in the middle. Roll the dough up into a log and turn in your hands until a round loaf shape in formed. Place into floured banneton, cover with plastic wrap, and allow to rise for 30 minutes on the counter.
- After 30 minutes, place dough into fridge.
- After 15 hours, preheat your oven to 475 degrees. Place your dutch oven into your oven while it preheats.
- Once oven has preheated, pull dough out of fridge. Remove the dutch oven from preheated oven and sprinkle polenta into the bottom. Place sourdough directly into dutch oven as score as desired. Cover with lid and place into the oven.
- Bake for 25 minutes.
- Remove loaf from dutch oven and place directly on oven rack. Stick a wooden spoon into the door of your oven and bake loaf for an additional 25 minutes.
- Remove loaf from oven and place on cooling rack until ready to enjoy.
Nutrition Facts
Calories
1923.6Fat
7.64 gSat. Fat
0.98 gCarbs
394.09 gFiber
17.09 gNet carbs
377.01 gSugar
1.4 gProtein
61.57 gSodium
3903.34 mgCholesterol
0 mg
Valentine’s Gift Ideas
We’re rounding up some fun gift ideas for women, men, and kids this Valentine’s Day!
I love any excuse to celebrate love and to give gifts, how about you? Today we’ve rounded up a few ideas to gift your friends, significant others, and kids for Valentine’s Day. Check it out!

Citrus Body Bar - any bath essentials make fabulous Valentine’s and Galentine’s day gifts! We love this citrus bar from Beauty Counter! (if you don’t already shop with a consultant, please select Alisa Jeffus during check out! I’d appreciate your support!)
Gourmet Mexican Vanilla - this is hands down the best vanilla we’ve ever baked with! This gift would be perfect for the baker in your life!
Pajamas - always pajamas! Comfy, cozy, cute. You just really can’t go wrong with gifting yourself or your bestie with a pair of these ultra soft Valentine’s jammies.
Live-in tank - I bought myself this tank & high rise undies set years ago and I’m still obsessed with them! Classic cut, perfect for light weight jammies or to wear during the day/under your clothes.
Candles - I’m also a huge fan of gifting candles (and gifting them to myself too), I have my eye on this Palo Santo candle from Chalkfull of Love in their Valentine’s collection. Check out their mugs and other fun items too!
Romance novel - know a bookish gal who’s looking for her next book? Grab a fun romance novel! I’ve linked one of my favorites - The People We Meet on Vacation by Emily Henry. I’ve loved reading this author along with Taylor Jenkins Reid, Abby Jimenez, Carley Fortune, and Ali Hazelwood.

Valentine’s books - books about love, friendship, and sharing are always a great idea, and make the best gifts for kids this time of year. I created an idea list of my favorite PaperPie reads I think kids of all ages will love!
Pajamas - I love gifting my girls pajamas for almost every holiday. Its such a cozy way to celebrate! Our favorite, softest sets come from Plain Jane. We’ve bought multiple pairs for each girl now because we just love the quality!
Bath bubbles - in addition to pajamas, I also love gifting bubbles for every holiday! We’re big fans of Tubby Todd and love all of their scents. Bath bombs would be a fun gift too!
Butterfly wings - I love open ended dress up play and my girls love it to! Grabbing a toy where they can use their imagination is always a great gift! We love this one from Sarah’s Silks!
Kid’s garden bed - start the spring off right with this kid sized garden! They’ll have so much fun getting their hands dirty during planting, watering their plants, watching them grow, and then eating what they’ve grown!
Personalized puzzle - my daughter just learned how to spell her name and I know she’d love putting together this personalized puzzle all day long.

Ember coffee mug - we love this mug that keeps itself warm! Now his coffee will never get cold.
Comfy beanie - we love shopping Patagonia for their sustainability practices, so we always turn to them for outdoor gear and clothes. We love this one to keep your SO warm!
No bleed highlighters- is your partner an avid reader? These highlighters are AMAZING! They don’t bleed and come in aesthetically pleasing colors (read: not obnoxious). You have to check these out!
Gym equipment - support your guy’s fitness goals with these gym essentials or grab some equipment for a home gym! We love this brand!
We hope this list inspires you if you’re giving gifts for Valentine’s this year! Experiences make wonderful gifts as well, so if you’re going gift free, I hope you find a fun way to celebrate your love for your spouse, partner, friends, and kids!
Intentional Coffee at Home - Part 2: Making Good Coffee in a Coffee Maker
Learn all about the tools, processes, and techniques to make a delicious cup of coffee in your home coffee maker.
We’re picking up where we left off in our series, Intentional Coffee at Home. In Part 1, we covered a few of the basics like gathering equipment and sourcing great coffee to use at home (read it here), now we’ll focus in on:
Step 3: Practicing Good Technique

A coffee maker is one of the simplest ways to make coffee at home. And honestly, it doesn’t require too much technique. The best investment you’ll make with this method is in picking out your coffee maker. While there are many models on the market, there are a few that stand out for their treatment of the coffee during the brew.
A few years ago when I decided to get a coffee maker, I chose the Bonavita 8-cup coffee maker with a glass carafe. I chose the glass carafe simply for the look of it, but the model with the thermal carafe is a fantastic choice as well (in fact, it probably holds it’s temperature longer than the glass). The reason I chose this machine was not solely for the looks, but also for the way the coffee is brewed.
I was trained as a barista at a cafe that was known for its pour over coffees, so I learned to take a lot of care and use a lot of intention in making coffee. I wanted a coffee maker that would mimic the pour over coffees I was making every day at work. I didn’t want water to douse the beans and mess with extraction, I wanted a more methodical, careful automated pour of water over the coffee bed just like my pour overs I was making in the cafe. Back when I started as a barista, there weren’t too many coffee makers on the market like this. But since then, a variety of options have come on the market.

Choosing Your Coffee Maker
The Bonavita I mentioned earlier is a reasonably priced option for a coffee maker that closely mimics the pour over method. This machine allows for a bloom (we’ll discuss this more in part 3 of this series when we discuss making pour overs) and automates the water so that the coffee is evenly extracted.
There are a few other options for coffee makers I’d recommend, in case you’re interested in researching what might work best for your home set up. I love the look of the Ratio Brewer, but it is more expensive. And I’ve heard great things about this Oxo Brewer - it brews directly into the carafe which cuts down on heat loss which can occur in the other two brewers I mentioned.
Brewing Your Coffee
Coffee made with a coffee maker needs a medium-coarse grind setting. Looking at your grinder, move the dial a few notches away from the middle, toward the coarse setting. This brewer is resilient – it won’t take much trial and error to find a good grind setting. Always taste and adjust, but you may find that you enjoy the first setting you try.
I like to have 18g of ground coffee per 10oz cup, so a four cup brewer would need 72 grams of ground coffee (my 8-cup brewer makes 8 5oz cups of coffee, which equals out to 4 full 10oz cups of coffee - make sure you look at ounce measurements here instead of cups!). I list out measurements in grams, because for accuracy, we use a scale to measure out our coffee. If you don’t choose that route or don’t have access to a scale that weighs in grams, 18g equals out to a 1.5 tablespoons and 72 grams equals out to 6 tablespoons. I like this ratio for single origin coffee, but you may want to up the dose for coffee blends (try closer to 80g if you like it stronger!)
Now that our coffee is ground appropriately, we can brew our coffee.
The coffee machine doesn’t require too much technique, that’s part of what I love about it!
For an 8-cup coffee maker:
Weigh out 72 grams of your coffee of choice.
Grind at a medium-coarse setting.
Add 40 ounces of filtered water to the water tank on your coffee maker.
Place filter in the basket of your coffee maker & add ground coffee.
If available, bloom your coffee per the instructions on your machine.
Turn the coffee maker on to brew.
Once finished, pour coffee into your favorite cup and drink black or with milk!
My coffee maker offers different size brews, so I adjust this ratio for whatever I need (36 grams coffee to 20 ounces water, 54g coffee to 30 ounces of water). The same process applies!

Final Notes
A coffee maker is a pretty easy tool to use at home and it can do so much with so little effort! I love this method when I don’t want to spend as much time on my coffee or when I’m making coffee for a crowd. Figure out what you need for your desired home coffee station and play around with it until you find exactly what you like.
I hope this has been helpful in getting you started with your own home coffee station. If you have any questions about tools, ratios, or techniques, feel free to leave a comment or send me an email! I’d love to nerd out about coffee with you! Happy brewing!

Intentional Coffee at Home Part 1: Setting Up Your Station
Learn the initial (simple, but important) steps it takes to make delicious coffee at home.
Today I’m sharing some easy tips to implement making delicious coffee at home! I’ve been a barista for over six years now and I’ve discovered some key factors to up your coffee game at home.
We believe in bringing intentionality to everything we do and that can be as simple as starting with good coffee! Slow down, create with care and precision, and then savor and enjoy. While some days call for a quick coffee while running out the door, I hope you’ll join us here at Intentionally Ordinary by waking up a few minutes early and savoring your delicious cup of freshly ground, freshly brewed, homemade coffee before you start your day.

Step 1: Source Good Coffee Beans
A lot goes on behind the scenes to get coffee to our homes, so I like to be intentional in choosing beans that support farmers, businesses that put a lot of thought and care into their coffee, products and equipment that make the coffee delicious, and processes that will result in a delicious product to wake you up in the morning.
Coffee is so fascinating, and I’m tempted to give you quite the run down about how coffee is grown and sourced. But I’ll keep it short. Coffee grows on trees in a cherry like fruit in regions around the world, but primarily in Central and South America and in Africa. The beans are harvested from the cherries and washed or dried, then packaged up and shipped to coffee roasters in your neighborhood, across the country, and all over the world. Coffee roasters turn this little green seed into the coffee beans we know and love through a detailed process of heating and cooling to achieve optimum flavor. The roasted coffee is packaged up and delivered to the grocery store, your local shop, or shipped to you. Even though this is an abbreviated version of coffee’s journey, you can see it takes and immense effort to arrive at coffee’s final form.
There are so many people involved in this process and in recent years the specialty coffee industry has highlighted individual farms that are caring for the coffee plant with intention. Because of this highlight on high quality beans, specialty coffee shops also strive to treat the coffee with intention and use products and processes that make these coffees shine.
As an experienced barista, I also want to bring this intention home with me. Many may treat coffee as a vehicle for energy, but for me coffee is meant to be delicious on its own, enjoyed with good friends, or savored in a quiet moment.
Our lives move at a frenetic pace in the modern age and I’m beginning to see the value in slowing down to not only be intentional with where we get out coffee and how we make it, but also in how we spend our moments drinking it.
So our first step to making intentional coffee at home is to source good coffee beans.
Here’s what I look for to know that a roaster cares about where its beans come from: bags are sold in whole beans, bags list country of origin and the name of the farmer/farm, bags list tasting notes, and beans are roasted “medium”. This has some exceptions and I’m sure there’s delicious coffee that doesn’t fall into these qualifiers, but for me this is a baseline evaluation of if I can trust the roaster to make a good product. If the company truly cares for its coffee, it should be highlighting these features in a majority of these products.
I highly recommend doing your research and finding a local roaster near where you live. There are some bigger companies that I would recommend like Blue Bottle, Verve, and Stumptown as starting points. These companies might be available in your grocery store. And of course so many amazing small roasters are accessible online. I love Heart, Good Coffee, Be Bright, Go Get ‘Em, AndyTown, and Saint Frank, just to name a few. But, if you live in a town that has a local coffee shop or even coffee roaster, I’m a huge advocate of supporting local.
Once you’ve researched and sourced delicious whole coffee beans, roasted from companies that seek out high quality beans from intentional farmers, you’re ready to gather equipment to make that coffee shine.

Step 2: Purchase High Quality Equipment
There are so many products on the market that all claim to make great coffee. I’m sure many of them do, but part of living in an intentional home is only bringing in the items that are necessary and serve you and your goals. I encourage you not to get swept up by the latest new thing, simply invest in the product that will help you make fantastic coffee.
Start by evaluating what kind of coffee you want to have at home – drip coffee or espresso are the primary methods. Do you want to serve coffee to a crowd? You’ll need larger carafes to do so. Is the coffee just for you? Smaller equipment will be sufficient here.
Once you’ve evaluated your needs and your ideal set up, it’s time to purchase essential equipment. Regardless of the brew method you land on, I recommend buying a burr grinder and scale. These can be purchased at varying price points, so I’ll link one inexpensive grinder here and a pricier option here. The primary component you’ll need in a grinder is burrs – blade grinders do not produce an even grind and should not be used in making quality coffee. A kitchen scale can suffice for measuring your coffee, but I highly recommend a scale with a built-in timer if you’ll be making pour overs– here’s an inexpensive option and a splurge option here.
If you’ll be primarily making espresso, I recommend Breville products – the espresso machines come with all the equipment you’ll need like a tamp and a milk steaming pitcher. The machine is easy to program and makes delicious espresso without too much experimentation. I have this model, but there is also a larger version that comes with a built-in grinder (here’s that link). Evaluate what space you have, and which one works best for nourishing your beautifully ordinary life.
If you love the convenience and size of a coffee machine, there are multiple options on the market that make exceptional coffee. I use this one, but I’ve heard amazing things about this one. Both brew large batches of coffee, so they’re perfect for a crowd, but also have some cool features that allows for careful and precise brewing.
And finally, if you’d like to try your hand in pour over coffee, you’ll need to source a few different items. I highly recommend a goose neck kettle and for convenience, an electric kettle that heats water is a huge time saver. I have this one and I love it. You’ll also need your pour over dripper. My favorite dripper is flat bottomed (as opposed to cone shaped) and you can find it here. For larger groups I like to use a Chemex – it can hold up four large cups of coffee!
Step 3: Learn the Process
Your coffee is in hand, your equipment is ready to go – next we’ll learn about technique.
Each brew method can be pretty detailed, so I’m going to split these posts up to make the information easier to digest.
So stay tuned for part 2 - brewing good coffee in a coffee maker, part 3- making pour over coffee, part 4- making espresso, and part 5- steaming milk. It’s going to be a fun journey, so check back on the blog for each part!

Resources for Nourishing Your Home
Today we’re chatting about products we use and love in our homes! These items help us intentionally create spaces where we/our families feel loved, cared for, safe, and comfy!
We believe our homes should be a haven where we feel safe and where our families feel cared for and loved. Being intentional with our design, bringing in pieces that provide comfort, utilizing tools that promote productivity and work to achieve our goals, are all part of curating an intentional home

Here are some of our favorite resources to nourish our home.
Cultivate What Matters - in a world filled with distractions it can be easy to watch days, weeks, months and even years slip by without feeling like you are accomplishing the things that are important in your life. These wonderful women have created beautiful materials and resources to help you focus on what matters. They have everything from journals, notepads, planners and even stickers to help this process be fun and joy filled too!
Tuft & Needle Mattress - this has been our favorite mattress to sleep on by far. We upgraded a few years ago and now we recommend it to friends and also bought it for our oldest daughter when she transitioned to a big girl bed! So comfy and soft and truly helps us sleep soundly at night.
Vitamix- the girls and I love smoothies and I love how easy it is to blend up our favorite breakfast! We’ve made pancakes, blended soups, made homemade nut milk and more with our Vitamix. Click the link above to shop new or click here to buy refurbished models.
Dyson vacuum- handheld cordless vacuums have been saving our lives these last few years! We’ll never go back & we’re telling all our friends about how amazing it is to just pick up the vacuum and go with no fuss.
Minimalista by Shira Gill - I’ve been loving browsing through this resource to intentionally minimize the things in my home. Shira talks a lot about keeping things cozy and functional too, so I don’t feel like I’m sacrificing too much while also downsizing & organizing.
Thrive Market membership - we’ve been loving and using Thrive Market for over 6 years now. We love the discounted prices, fast shipping, and variety of brands and products offered. We consistently order our favorite pantry staples from Thrive like bulk spices, cooking oils, flour, canned goods, and lunch box snacks. We come back month after month to restock on all of our favorites! Click the link above for 40% your first order 👏🏻
We hope this little list helps you bring items into your home intentionally so that it feels like a safe and comfy space for your and your family!